September 21, 2015

Migratory Inspiration

Every morning our cardinal vines are visited by hummingbirds. Except of course this morning — the one where i tried to capture them with my camera. I stood there as still as i could until my arms started to fall asleep and my eye (that was pressed against the viewfinder on my camera) started to water. But the vine is so pretty! It's an annual and we plant it every year just for our seasonal visitors.
Here it is rambling up and over our yew shrub in the front yard. Pete had the wonderful idea to use the shrub as a natural trellis, and it's been a beautiful addition to our garden.
The monarch butterflies, though few, are here each day fluttering around to the many native plant species we selected especially for them.
monarch on butterfly bush, Black Knight
They particularly love (as in they circle around our entire garden and 99.9% of the time land on this plant) Liatris Ligulistylis or Meadow Blazing Star.
I check our milkweed every day with the hope of seeing a little monarch caterpillar, but none sighted so far.
Sadly, Monarch populations are down so much and they really need our help. The Xerces Society has a number of wonderful resources and information about what you can do right in your back yard. Even if you have a very small area you can plant a pollinator feeding station. It's all about picking the right plants for your area. Check this guide for more info. A wonderful plant no matter where you are: Zinnias. They attract all kinds of bees and butterflies (including this Black Swallowtail), and they come in so many beautiful colors!
Ok, that's the end of my PSA. The benefits of helping butterflies, for me, have been a daily lift to my spirits and much inspiration. Keep this in mind when i share more {soon} about Aria...my next fabric collection for Moda!
Have a beautiful day!
xo,
Kate

September 8, 2015

DIY, Part 4

Hello hello! Hope everyone had a fun-filled Labor Day Weekend and celebrated the last breezes of the summer season. It's always a little bittersweet to see subtle tints of color creeping into the treetops, but there is so much to love about each season that i happily welcome this transition and look forward to seeing things i missed last year. Hope you spot some new stuff too!

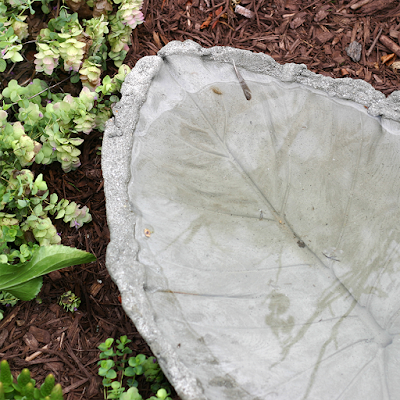
For the next DIY from my Pinterest board, i made a "Leaf-relief Concrete Bird Bath" using an elephant ear leaf. I followed this excellent tutorial. The only things i did differently were to use a finer grain "play sand" and Quickcrete Mortar Mix, both from Home Depot. I wanted to use portland cement, but it only came in 80lb. bags!
materials gathered
leaf covered with concrete
This next part is critical. No matter how tempting it is, do NOT even try to turn the concrete-covered leaf over to "check" it for at least 24 or 36 hours. How do i know that, you ask? Well, i made a second bird bath with a larger leaf and made the hasty mistake of trying to pick it up too soon. It broke into many pieces that were unsalvageable. You're rewarded for your patience, though, because look how beautiful it is when you peel the leaf off! I was surprised at how many of the veins and details were transferred to the concrete.
peeling the leaf off
Here is the well-cured and water-filled birdbath ready for bathers!
And i was so happy to spot that little feather a few mornings later. I guess the birds like it as much as i do!
Have a beautiful day!
XO,
kate


September 3, 2015

DIY, Part 3

Can't believe i'm writing this, but...Happy September! If you've been following along, here is the third of the projects i set out to make from my "DIY didn't i think of that" Pinterest board. It's been lots of fun taking these projects on and this was (so far) my absolute favorite — Shibori Dyeing.

I picked up some 100% cotton napkins to dye and they were the perfect thing to use to experiment with many different kinds of Japanese tying techniques. I followed this tutorial and it was very easy to follow, probably because Erica was much more methodical in documenting everything than i was! I highly recommend visiting her site to learn about the materials and techniques. Sometimes, it's nice to put the camera down and just enjoy the process! But here are a few photos i took along the way...
string, dowel, wrapped and bound fabric
various Japanese tying techniques
first dip
When you pull the fabric out of the dye bath, it's initially yellow in color. As the fabric oxidizes, it begins to turn blue. This is amazing to watch happen before your eyes!
unrolling fabric as it oxidizes
This technique is called "Arashi", the Japanese word for "storm" and used a 2 foot length of PVC piping (bought at Home Depot). You roll your fabric around the pipe, knot the string around one end, wrap the string around 6-7 times, then scrunch the fabric down toward the knot. Repeat until you've scrunched all the fabric and it looks like this. 
You won't believe it, but the print on the right (below) is what it looks like when you unroll it. Amazing!
Here's a detail. Ah! Indigo is one of my absolute favorite colors.
The next technique is called "Kumo" which is a "pleat and bind" process. I improvised a bit from the instructions on Erica's blog and it's really hard to go wrong. The end-results will look beautiful no matter what.
 
I found myself saying "i wonder what would happen if..." a lot and then dove-in to some freewheeling experimentation. For this one, i did a simple accordion fold and then rubber-banded (that's a verb right?) the whole length.
And this is what it looked like.
I have no idea how i did this next one (and many of the others).
And this one takes me back to grade school. Just gather the fabric from the center (or the more grown-up off-center) and band it at different intervals down the length of the gather.
It looks something like this every time.
So, how about it? Throw caution to the wind at try your hand at this. Well not literally, because they'll end up blue.

Craft yourself a beautiful day!
XO,
kate