
One of the nicest things about designing quilt fabrics for Moda Fabrics is seeing what you all create with the collections. A recent example is Phoebe's modern take on the timeless "Grandma's Surprise" quilt, which she created using my Canyon collection. I'm grateful to Phoebe for taking time out from her work as a historian in London to enthusiastically share her quilt and the steps she followed to make this stunner. Heads up, Phoebe's included very useful templates and a nifty conversion tool. Enjoy! Kate
Creator Spotlight: Phoebe Chow
Hi everyone! I’m Phoebe Chow (you can find me here) and I’m going to write about making the Grandma’s Surprise quilt with Canyon fabric by Kate Spain for Moda Fabrics. First, a bit about me: I’m a Southern Californian living in London, England. I moved here for graduate school and now teach international history. I got into quilting around 2 years ago when I discovered fabric bundles at the John Lewis department store here in London. I learned (almost) everything about quilting from YouTube, so I consider myself a bit of a rookie. But, I hope that my being a beginner causes you all to realize that this quilt I made isn’t that daunting!
Now, about this quilt.

I saw Canyon on Kate’s Instagram the day she posted it, and it’s been my favorite fabric thus far. I love the bright and cool colors of her Canyon line for Moda Fabrics.

I knew I wanted to do something special with this fabric, but I still had a few months before it came out in the shops. I saw the Grandma’s Surprise quilt online, created with the timeless kaleidoscope block. There are many good resources online and in print that offer steps on making this famous block. Some of my favorites that I came across are Karen Lewis’ and Elli Beaven’s. It turns out that Karen was inspired by the block recipe in Joyce Gieszler’s Then and Now Quilts. Further research on IG found that Ramona Cavanaugh and her husband had made templates after being inspired by Amy Ready’s quilt and they generously offered them for free!
You can find the templates here:
In the meantime, before the Canyon fabric became available, I wanted to make a special quilt for my parents. So my first try with this pattern was with Fig Tree & Co’s Somerset fabric collection by Moda Fabrics.

This is where my awesome husband, Jason, comes in. Here's me and Jason in the Lake District in Northern England.

Since I’ve gotten into quilting, he’s helped me figure out patterns—actually, Jason taught me how to use a sewing machine. Based on Ramona’s templates, we did all this math-y work to figure out just how much fabric I needed and how big to print the templates to make the quilt the size I wanted. I didn’t have that much fabric, so it was important for me to make sure I had enough from the beginning. And so, he made a spreadsheet for me, which Jason wants me to share here with you. Sometimes the link only takes you to Google Drive, so from there, go to https://drive.google.com/templates and then search ‘Grandma’s Surprise/ Kaleidoscope Block’.
If you want to follow exactly what I did, here are my quilt measurements and fabric requirements: For an approx. 30” x 30” top (before borders) and 40” x 40” (with borders) I used:
1 Canyon layer cake (and had approx. 40% of it left over). You could probably use 2 charm packs, but I haven’t yet tried.
1/2 yd of white background fabric. I used Moda 9900-97.
If you want even more specific measurements, so you barely have any waste, you can use the spreadsheet for exact calculations.
If you print out Ramona’s templates as they are, you’ll have a mini quilt, so my husband maximized just the one larger template to fit on one piece of UK-sized printer paper (since you can just cut off the big triangle to get the smaller template for the other pieces).
Now, this is the ‘tricky’ part, although it’s not that bad. Trust me!
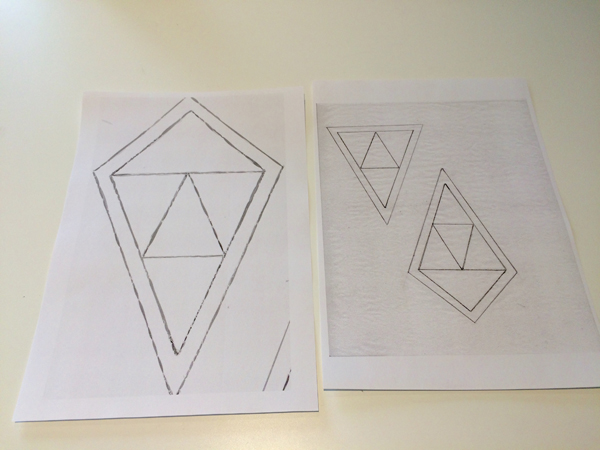
By inputting my desired finished block size (10 inches), the spreadsheet will generate numbers for ‘Big Side’ (2.93), ‘Big Hypotenuse’ (4.14), ‘Small Equal’ (2.71) and ‘Small Side’ (2.07).
Measure the ‘Big Side’ and the ‘Big Hypotenuse’ of the large triangle from your print-out. You’ll have an idea of how ‘off’ you are from your desired size.
I reduced the template to 75% and I got those exact numbers! Note: I did use UK-sized printer paper, which is 8.27 x 11.69 inches. So you’ll have to play around with your own printer. Of course, if you’re not too finicky about the exact finished size of your quilt top, then just measure the print-out and play around with the ‘finished block size’ number until the other numbers match. (My parents’ quilt top finished around 40” x 40” and the template was maxed out to 100% on my printer.)

100% vs. 75% with Measurements
I had no idea how to paper-piece before this pattern, so be encouraged! I just watched YouTube tutorials like this one and this one. I know it’s better not to use printer paper, but that’s all I had, and if your stitch is small enough, it’s still easy enough to tear away.
Do some coloring to figure out color placement, etc. Once you decide on your design, you’ll figure out exactly how many pieces of each color you need and you can fill in the spreadsheet accordingly.

Before printing and cutting everything, I’d practice making one of these first.

You’ll need to print and cut out
From the paper:
36 Big Pieces
288 Small Pieces

‘Big Piece’ and ‘Small Piece’

Because I enlarged the template, I printed out many copies of the one big piece and I just cut off the tops to make the small pieces.
Remember to use different scissors for fabric and paper!! My husband is adamant about this.
If you follow my exact color placement, you’ll need:
Fabric:
For the Small Triangle Pieces
160 White Background
32 Red
24 Yellow/Green
24 Printed pattern on White
8 Grey
20 Purple
20 Blue
For the Large Triangle Pieces
28 White Background
8 Grey
If you’re changing the design, just count the different colors on your coloring sheet.
Generally, in cutting out fabric for paper-piecing, quilters add 1” to the measurements. Here’s a more specific method (here.) What I did was cut as I went along, figuring out how best to maximize my fabric usage. Be sure to be generous when cutting out; otherwise you'll do a lot of unpicking! I know from personal experience!

As you can see, I wasn’t very exact with cutting out, but I was generous!
Then, just paper-piece the blocks. Use a smaller stitch length, around 1 inch.

When assembling the block, I used a ¼ -in foot to sew the top 4 pieces of the block together. Then I sewed the bottom 4 together with the ¼ -in foot.
Next, join the two sections. For making sure the points are good, I’m going to give you a TIP! I know points are important to quilters! The points in the first one I made for my parents were off so many times, I spent hours unpicking and even hand-sewing until the points semi-matched up. This one is not perfect either, but it’s better. I give the credit to an improved sewing machine and to this tip I learned from EdytaSitar on FQS’ YouTube channel (around the 11 minute point in the video). When matching a lot of points, especially in any ‘star’-type pattern where a lot points meet in the middle, you can apply Edyta's helpful tip:
1st, pin like crazy. Then, start sewing from the middle to the outside of the block. Check the point. If it’s good, then sew from the middle out to the other side. If it’s not, then, unpick and repeat. I have to confess, I still unpicked a lot.
My first block wasn’t perfect (nor were the rest!), but the quilt still came out nicely.


Repeat the above steps 9 times and you’ll have a beautiful quilt top! You can also add borders (inner: 1 inch; outer: 4 inches completed), like I did.

Phoebe Chow
London, England


